
TitleGarrison
“No bird ever flew nonstop from New York to Tokyo, or raced 15 miles high at triple the speed of sound.
But birds do something else.
They do not conquer the air; they romance it..”
Peter Garrison
HoursAndCounting
Jur's RV7 Aircraft Factory
2917 hours and counting
Some decisions in life are bare of any obvious logic
Priming
Priming
Priming is one of those topics on the build process where you will find hundreds of different opinions when you read through various forums and builder websites.
They even have invented a word for it: "Primer wars", as discussions often don't go without emotion.
My intention here is not to start another primer discussion but just to document what my process has been and how it changed over the years.
The current system I use is a mechanical primer from Akzo Nobel. Mechanical primer means that it is not a primer that etches inside the material but just covers the surface to make it air tight against the exposure of the metal to oxygen.
In the articles below, you will find some articles where i talked about priming.
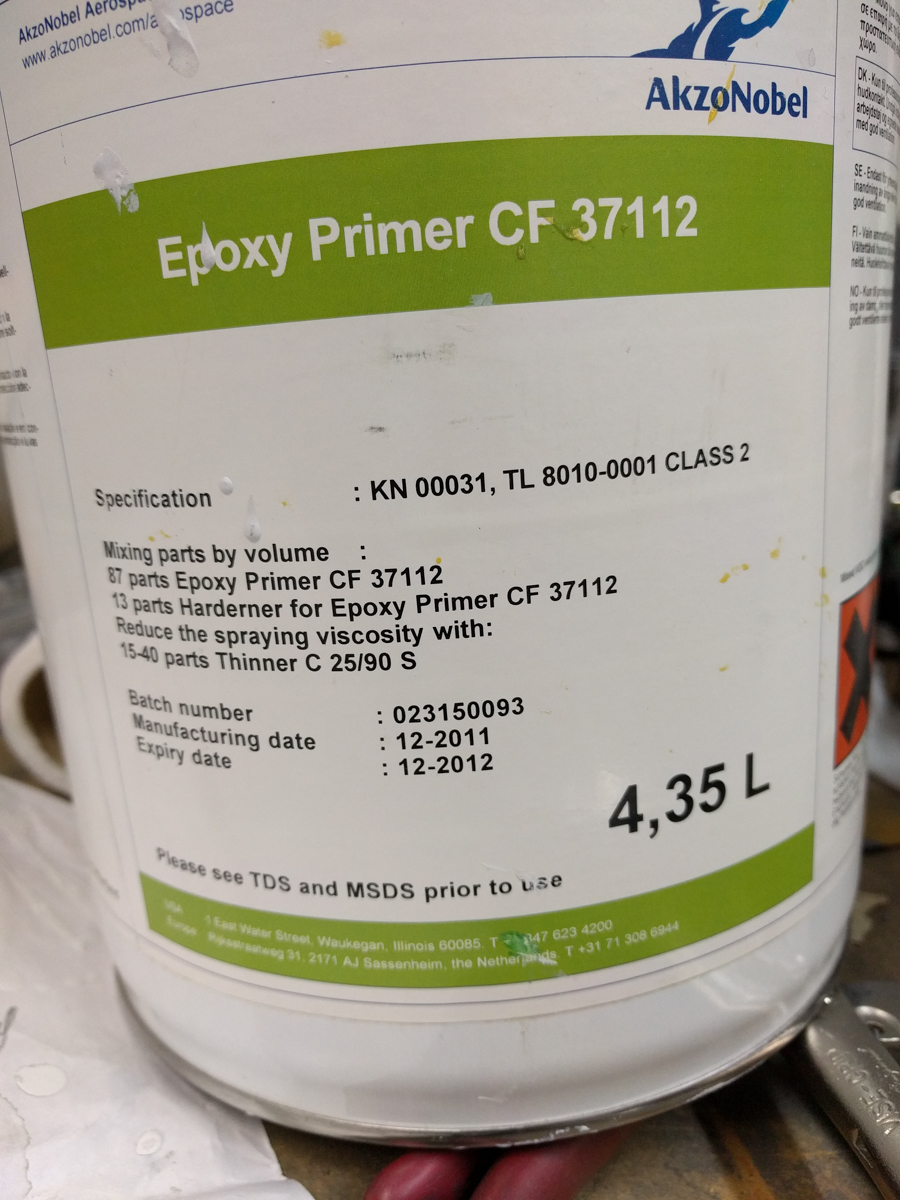
Akzo Nobel primer
This is the new epoxy primer I have been using after the zinc chromate era.
I bought it at a company on the lelystad airport in the netherlands.
It's pretty expensive stuff and apparently it seems to be the same primer used on the latest Airbusses these days.
It comes with Hardner and Thinner to control the viscosity. Great stuff, but as said, pretty expensive and not possible to buy small quantities. You have to buy it per 10L so I'm lucky that my fellow builder Hugo is using the same.
About priming in general
Priming is a dull but necessary work if you want to protect your airframe for the test of time called corrosion.
The 2024-T3 aluminum of Vans is already covered with an Alclad layer which by itself should already provide protection. However, many of us builders choose to increase the protection layer with an additional coat of primer.
Many debates have been held on priming and priming procedures. It's such a big topic with so much discussion that you will often hear the term 'primer wars' in the forums.
I have personally choosen for the zinc-chromate protection process. It is a high poisonous product that can lead to cancer if not protected well by respiratory filtering. So be aware !!! This is not stuff to joke about and certainly not to think you'll get away with it just once...
YOU WON'T ! ALWAYS.... ALWAYS make sure you are protected.
My protection consists of:


- a full suit coverage of light plastic over my normal clothes with head coverage.
- rubber boots
- light surgical plastic gloves and on top of those a set of heavy rubber gloves.
- A 3M full face mask with double carbon filtering. If your's is not full face, make sure you wear closed plastic glasses to prevent the product to enter your body via the eye openings
- wear earpluggs again to prevent product to enter your body.
That being said, let's talk about the procedure of applying zinc-chromate to bare aluminum.
Step 1, clean the raw material with degreaser. This will clean the material from any type of grease that will prevent the primer from sticking.
I clean with Silikon Entfermer® from Spies Hecker™ (Silikon Entfermer 7010) to remove grease from fingers etc. This must all be re-done just prior to priming.

Step 2, I thouroughly clean with aceton® and clean paper towels to remove the sharpie pen ink. It is not a good idea to leave the pen markings underneath the corrosion protection.
Then, gently and lightly scuff the material with maroon/red scotchbrite pads. This doesn't need much, just lightly scuff it up so micro scratches appear on the surface. The surface will no longer be shining but will become rather dull.
A lot of people are concerned about taking away the alclad layer when scuffing the material. I found the following remark in a forum very sensefull and helpfull:
"I was an airframer (rivet banger) in the Navy and spent 9 years after the Navy working as a machinist in a tool and die shop. Trust me it would take some major elbow grease to wear through alclad with a maroon scotchbrite
pad. Just some food for thought I belive a beer can is approx. .003 thick (The last one I checked several years ago was) and lets say that the alclad is .002 thick. Think about how much effort it would take to rub through two thirds of a beer can with a scotchbrite pad. "
Step 3, after scuffing, and just before priming, repeat the step 1 cleaining but this time with a real clean piece of soft cloth that is full wet with the sillikon entferner. Apply the product in one direction only. Then take a dry clean soft cloth and go over the material again rubbing in the same direction. Do not let the material dry by itself. You have to dry off the product after a minute or so.
After step 3,make sure you don't touch the material anymore with bare fingers.
Step 4, priming time...
Priming is achieved with a HVLP spray paint gun.
HVLP stands for High Volume Low Pressure.

The pressure setting for the gun is written in your gun manual. Take care not only to have a setting on the compressor, but also buy a little gauge that sits just at the entry of your gun. At this location, you need typically between 18 and 25PSI while spraying. So adjust your air linet while spraying air.
Set your compressor about 20 to 25 PSI higher then the entry setting at the gun. This will ensure enough pressure at the gun but also won't kill your compressor in continuous recharging.
A spray paint gun has a number of adjustable parameters: the air inlet pressure, the volume control, the spray fan control and the spray direction.
There are many interesting links on you tube that show you how to use a HVLP gun.
Priming Tools
In this section, I want to describe the hardware and materials I use for priming the parts.
First of all you need a air compressor. Good news ! You already have one since you needed one for the plane building. Remember ?
Well if you were smart, you bought one with at least 100 liter barrel. That way, you won't have to stop all the time when spray painting for the compressor to recharge.
Secondly you need a spray paint gun. Below you can see a picture of my gun.
Optionally for corrosion protection but I believe mandatory for painting is a water/oil filter on your compressor. It's a, expensive piece of equipment but getting dry clean air when painting is an absolute must.

The transparant bubble below will collect the water that get's extracted from the air. The little white foamy cylinder in the middle is the oil filter. Air goes it from the left and comes out right. So you just connect this to your compressor. The gauge on top allows to regulate the output pressure. The little screw in the bottom has to be loosened from time to time to release the trapped water.
How to use
Use the kit buttons in the top ribbon bar to see a chronological overview per sub section per kit. For the full chronological article list, see chronological build link in prelude menu here below. The easiest way to lookup information is by typing in some part numbers or keywords using the search option in the ribbon bar
Caution !
Some advice on reading my log for fellow builders !
In some articles, I made corrections at later date on the original article to rectify my own stupidities or faults. Read through the entire article if you intend to use my findings/experiences on your own project !
Other content
Social Networking
Legal Mumbo-Jumbo
It’s possible (not likely) that I’m not as smart as I think I am. (Occasionally, I have moments when I know this to be true. Fortunately, the feeling passes quickly.) Although I have tried to make this information as accurate as I can, it is not only possible, but also quite likely, that erroneous and misguided information lurks within these pages. I cannot and do not warrant these pages to be error free and correct. Furthermore, I accept no liability for the use of this (mis)information. And, as many would say, your mileage may vary. If, after reading this, you are intent on proceeding, please be aware that the contents of this site are protected by copyright (copyright © 2011 and 2012). Nonetheless, you may copy this material subject to these two conditions: (1) any information used is for non-commercial purposes, and (2) the source of the material is properly credited. Of course, you may link to any page herein. At some articles, snippets of the plans from Vans are visible. These are for educational and illustrations purposes only and should never be used as plans for part construction or assembly as plans may have changed since the picture was taken and more important they are protected by Copyright by the Vans Aircraft Mothership company.