After a long trip from Texas, over Pittsburgh and Toronto, the tools finally made it to my workshop in Belgium.
The next picture show the full overview of what I ordered layed out on my workshop table.
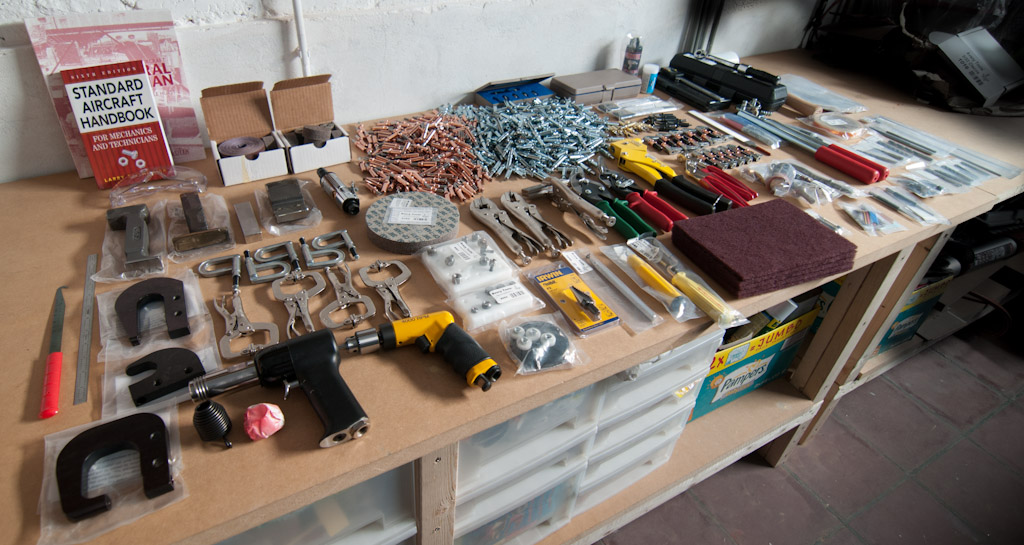
As you could see in the other articles on tools, I ordered the Avery tools RV builders kit (part nr KIT-106). The whole kit is layed out on the table including some additionally ordered tools that other fellow builders advised me to purchase right away to avoid more shipping cost later. When I finally got my hands on these tools, I was very very pleased with the quality. I saw some tools before from other vendors at fellow builder locations and I have to say that there is an ocean of difference in quality.
The good old saying applies here: you get what you pay for ! The difference in price is not significant enough to go with the cheap stuff.
Let's dig into the details.

The PAN AM 1/4" AIR DRILL. It gets up to 4000 RPM. Another one with a teasing trigger. I read in various locations that this feature is an absolute must.

Here is a tools that was not part of the standard RV builder tool kit. I ordered this one seperatly. If you already have an electric dremel, you don't need this. I didn't so I ordered this on based on air power.
You can find it in the avery catalog as the 1/4" DIE GRINDER, as part 7758. This is compatible with the miniature scotchbrite wheels in the kit.

The 90° angle drill kit is delivered with the kit and contains all required drill bits.

This is the 3" avery hand squeezer. Used to set rivets using hand power. It comes with one C-shaped squeezer yoke. You will need to order some additional ones for hard to reach placed. This squeezer is actually pretty low quality and requires tons of force to set a rivet or dimple. The one from cleveland tools is the one you should buy instead.

These are my 2 additional longeron squeezer yokes. (left top and bottom). The G shaped (part 7755) one comes in handy when you need to rivet on inside corners with folded over tips. The small one for narrow places.
They are designed for both CP 214 style pneumatic squeezers and Avery hand rivet squeezers. Made from 4130 steel, heat treated before machining to eliminate warping, then precision machined and hand finished.

Here is the rivet gun. I have never used one of these before. The other buliders told me to get a 3X because the 2X is too light to set some of the more heavier rivets.
You can still control the air inlet with an air regulator valve for the lighter rivets if needed. This baby has a teasing-trigger. The accessories delivered along are a beehive spring and a quick change spring.

This is my set of bucking bars. Some other builders adviced me to find a good mix of different shapes.
The kit comes with 3 bucking bars. On the left, the 620 bucking bar, On the right, item 615. The smalles one is the TUNGSTEN BUCKING BAR - 5/8" X 1" X 4".
The second one I bought extra.

These are the rivet heads. These pieces are mounted in the rivet gun to fit the right type of rivets.
From left to right: FLUSH swivel rivet set, 1/8" rivet set, Back rivetting set and 1/8" double offset rivet set.


The left picture is a set of dimple dies. Dimple dies are used to form dimples (little insertions/bumps) in the material to be rivetted so that the rivet sits flush againt the material. The small kit contains all required sizes.
Second picture is a 6 piece squeezer set mix. It contains some head to manually set rivets with the manual rivet squeezer.
The third picture is a 3/32" vise grip dimpler.I haven't got it figured out yet but I assume it's used to set dimples in hard to reach places.
The fourth picture is a 3/32" pop rivet dimple. Same principle, but here the dimple is set by using the manual pop rivet tool.

The stainly pop rivet squeezer.
360° SWIVEL HAND POP RIVET TOOL STANLEY brand professional hand pop rivet tool. Unique head design swivels 360° - for riveting in any position, at any angle. It has an extended nose for hard to reach places. Built-in handle latch. Die-cast aluminum & hardened steel construction. Molded grips. Includes (4) interchangeable steel nose-pieces for: 3/32”, 1/8”, 5/32” & 3/16” rivets.

Midwest aviation snips. Blades are austemper heat treated, producing a hard cutting edge that outlast all others. Full length pinch to point cuts up to 18 gauge sheet metal. Heavy gauge steel handles maximize force into cutting power at blades. Comfortable grips soft and durable copolymer won’t twist or wear though. The Red one is the left hand snip, the green one the right hand snip. It did not feel the need to buy a straight one at this point.

This is the countersink kit that is delivered with the kit from avery. Looks like good quality and robust material. I heared from many builders that good countersinking is one of the most challenging tasks in the building process.
This kit gives you five of the most popular countersink cutters, plus one needle bearing countersinks, plus a molded storage case with laser cut foam. Keeps the tools organized. Includes: (1 each) #40, #30, #27, #20, & #12 countersinks & #19365 cage.


Some of the more exotic tools. A fluting plier, hand dimpler and hand seamer tool.
On the left is the vise grip style fluting plier. Makes narrow & precise flutes for straightening ribs and bulkheads easier & better than pliers with molded jaws. Made from a 7” VISE GRIP pliers. Jaws are 3/16” dia. stainless steel pins TIG welded to Vise Grips .
The idea here is to make small indents in the aluminum at various chosen locations in rib in order straighten them before final assembly.
The center image shows a vise grip dimpler. Made for dimpling in restricted and hard to reach places where regular dimple dies won’t fit. Made from a 7 ” VISE GRIP plier. Machined tool steel dimple dies are T.I.G. welded to the VISE GRIP jaws then polished.
The right hand picture shows the hand seamer / 3-1/2” jaw. Has a vise grip locking feature to aid clamping & holding your work. Used for straightening and bending rib and bulkhead flanges. Made from a 7” VISE GRIP plier. Jaws are 3/16” X 1” X 3-1/2” stainless steel with 3/32” radius on front of jaws. Jaws Tig welded to Vise Grips.

The cleco pliers. One of those tools you will use until your hands will be soar. A followed the builders advices and bought an extra one right away. Always usefull also when someone stops by to help you out with the cleco-ing.
And now that we are talking about cleco's, here they are :

These little marvels are fun to work with. I already had some experience with these when helping out my friend Michael who is building a sonex. It's a real pleasure doing this kind of work as it is very constructive and looks impressive with all the little cleco's attached.
The cleco's in the kit come in various size.
The silver (zinc) colored ones are 3/32" size, the kit comes with 325 of those and I ordered immediatly 100 extra of these.
The copper colored ones are 1/8". There are 175 of those in the kit. I ordered 50 more of those
The black colored are 5/32". 10 of those in the kit.
The gold ones are 3/16". Also 10.


Clamps are tools you can never have enough. These are the types I purchased. The first picture are vise grip style clamps. The two pictures next to it show cleco style clamps.
The cleco style clamps come with the standard rv kit. I purchased the vise grips seperatly.
The picture on the right shows the 1/2" X 1/2" and 1/2" X 1" SIDE GRIP. The kit comes with 10 of each size. You attach them using the cleco plier tool.

The tools above are plate nut drill jigs. A plate nut is a small plate that gets rivetted on an aluminum skin or support. The center has a little cylinder is threaded. In other words, a little device that allows you to put a screw in from the other side.
Since drilling these small holes has to be very precise in order to have a nicely set plate nut, easiest way to do this is to use this little tool. I got them for the #6 and #8 screws. These are not standard in the kit and should be purchased separatly.


Every builders best friend: the 3M scotchbrite wheel cut and polish wheel. The kit also comes with a S/BRITE WHEEL KIT. This contains some smaller diameter wheels that can be used in the air grinder.
The rolled sandpaper is 240grit EMERY cloth role. ALUMINUM OXIDE Perfect for deburring, smoothing, and cleaning metal surfaces. Made with aluminum oxide material coat on jeans cloth backing. 2” wide X 25 ft. roll. >>2400 240 (Fine)

5 SCOTCH-BRITE HAND PADS. Use for cleaning and preparing aluminum aircraft skins before priming & painting, remove rust, corrosion, discoloration, & other surface contaminates. Gives a smoother & better finish than other abrasives. Non-woven nylon abrasive 6” X 9” sheets . Most popular and versatile grade . MAROON color.

The Vixen file. I believe this speaks for itself. I remember my fellow builders told me to use this as a knife. Always perpedicular on de workpiece.


Here are the deburring tools. Deburring is absolutly necessary for a number of reasons. First of all, non deburred material can create cracks when stress is applied which results later on in failure of the piece. I assume we all agree that a broken wing skin at FL100 is not a nice sight and that we want to avoid that at all cost. So deburring is nothing to go over lightly. Secondly, non deburred material can create nasty cuts while working with the material.
On the left, you see the drill hole deburring tool (speed deburr and countersink tool). It comes with a little extention piece for hard to reach places. The top looks like a large size drill head. Don't over-do the deburring with this. One or two turns is more then enough in order not to take away too much of the material. Certainly with thin skin aluminum sheet, special attention is needed.
On the right side, the yellow tool is the ROYAL MULTI-BURR DEBURRING TOOL This deburring tool has blades that swivel to follow the contour of the work; great for deburring lightening holes and edges of aluminum parts. Blades store conveniently in the handle when not being used. Blades are interchangeable by depressing the latch button. Comes with five (5) assorted style blades. On the left of it (the gray v-shape head tool) is the DOUBLE EDGE DEBURRING TOOL Used to quickly deburr edges of sheets up to 1/8” thick. Saves time and motion deburring edges of parts. One pass usually gets both edges of a part. Precision ground Carbide “V” shape blade with hex aluminum handle. Non-removable cutter style.


These are all the drill bits that come with the avery kit. They claim it is sufficient for the whole plane but I have some question marks on that.
40 #40 COBALT DRILLS (8 PCS)
30 #30 COBALT DRILLS (6 PCS)
21 #21 COBALT DRILLS (3 PCS)
27 #27 COBALT DRILLS (3 PCS)
19 #19 COBALT DRILLS (2 PCS)
12 #12 COBALT DRILLS (2 PCS)
1/4 1/4" COBALT DRILL (1 PC)
12X40 #40 X 12" EXTENSION DRILL
12X30 #30 X 12" EXTENSION DRILL
The image on the right shows some dril stops to protect the skins when match drilling or final drilling. The colored plates are rivet-gauges to check the size of the set rivet.

A unibit step drill. ( #3 1/4" to 3/4")


Two chucking reamers. Used to enlarge drilled holes. These are not standard in the kit. I ordered them seperatly.
The drive punched on the right are standard in the kit. 3/32" drive pin punch and 1/8" drive pin punch. You can already guess it, these are for hitting out faulty rivets. I sincerely hope I will need to use these as little as possible.

The kit comes with 2 books. The "standard aricraft handbook" and the "A/C structural technician handbook".
I started reading the first one. It contains some very theoretical sections on alloys that are kind of boring when you buy a kit. But there are also some very good sections on rivetting techniques, countersinking, dimpling and a lot of charts and reference tables that will be very usefull in the building process.

Another tool that is not in the kit but that you definitly will need. A torque wrench in inch/pounds. It's also one of the more expensive tools and is a high precision instrument. They come calibrated with a certificate. In Belgium you need this in order to be allowed to use it. Later you might also need to buy a second torque wrench in foot / lbs for torqueing bolt on the propellor eg but this is not necessary from the start. You definitly need the one in inch/lbs
The type I have bought is called a click-type torque wrench. They also exist with a dial that records the maximum pulled torque. But I would recommend this type as it's much smaller and easier to use in hard to reach locations.
20-150 in. lb. / 1/4” drive / .70# weight / 1 in.lb increments reading 10” long x .65” diameter handle. Avery PART# 4920. Later on you will be needing also a heavier torque wrench in foot pounds for the propellor and engine.
Some often used torque values will be 20-25 inch/lbs for an3 bolts in combination with AN365-1032 nuts and 50-70 inch/lbs for AN4 with AN365-428 nuts. (the values can be looked up in the standard aircraft handbook or "the bible" (being the AC43.13 1B chapter 7 from page 6 which you can find here)
Some advice on using the torque wrench :
- A torque wrench is a calibrated device. In principle it has to be regularily re-calibrated.
- Whenever you are finished working with it, make sure to re-adjust it to the zero position so the pressure is off the spring.
- When attaching a nut, first use a regular wrench to fasten the nut, then switch to the torque wrench to do the last part.
- Always torque the Nut, not the bolt head.
- First thighten the nut on the bolt with a regular key. Only use the torque wrench to do the final adjustment to the correct torque setting.

A Caliper. Measures inside distances and outside. I bought this one in a home depot on the way back from Canada in Burlington. It has a handy conversion function from inches to mm.
This one only shows actual inch measurements in thousands of inch which is sufficient but not very conventient. I ended up calculating fractions in thousands all the time and go really nuts on thousands values.
Better is to buy one that shows the fractions as real fractions like (5/16", 3/8", 23/64"). I bought one likte that later on to make my life easier and especially to stop the insanity of wanting to be always precise up to 0.001"

Air tool oil and Boelube. Oiling your airtools is crucial for lifetime of your airtools. Couples of drops in the tool every working day will do the job.
The boelube is a kind of paste that is used to facilitate drilling. (not part of kit)
To be complete, I also have to mention that the kit also contains an edge roller tool and an air flow control valve.

A toolbox with lots of compartiments. This is not an absolute necessity as all rivets and bolts come in little bags. But organising them in this way makes life easier and facilitates the search for a particular part when needed. With a dymo stickermaker, I labeled the boxes according to the namings on the plans and the bags. What you see in the picture is the content of hardware for the empenage kit.
So far the overview of the tools. I hope I have been able to provide some new builders with a good introduction to what is needed to start building. I took me a long time to take the final decisions who to go with, at what price and what to buy extra.
If I find and defects or bad experiences with one of the tools, I will post it hear later on. But so far... after first testing, all works absolutly fine.